
In e-commerce, high-quality visuals are critical – 90% of online shoppers prioritize photo quality when deciding to buy. AI-generated fashion models can meet this demand by focusing on two key elements: lighting and textures. Proper lighting ensures images feel natural, avoiding the "uncanny valley" effect, while detailed textures make fabrics and skin look lifelike. Together, these elements can increase conversion rates by up to 33%.
Key takeaways:
- Lighting should follow physics principles (e.g., consistent shadows, realistic highlights).
- Textures must show fine details like fabric weaves, skin pores, and material finishes.
- Tools like Mock It AI simplify this process, offering affordable, fast solutions for creating realistic mockups.
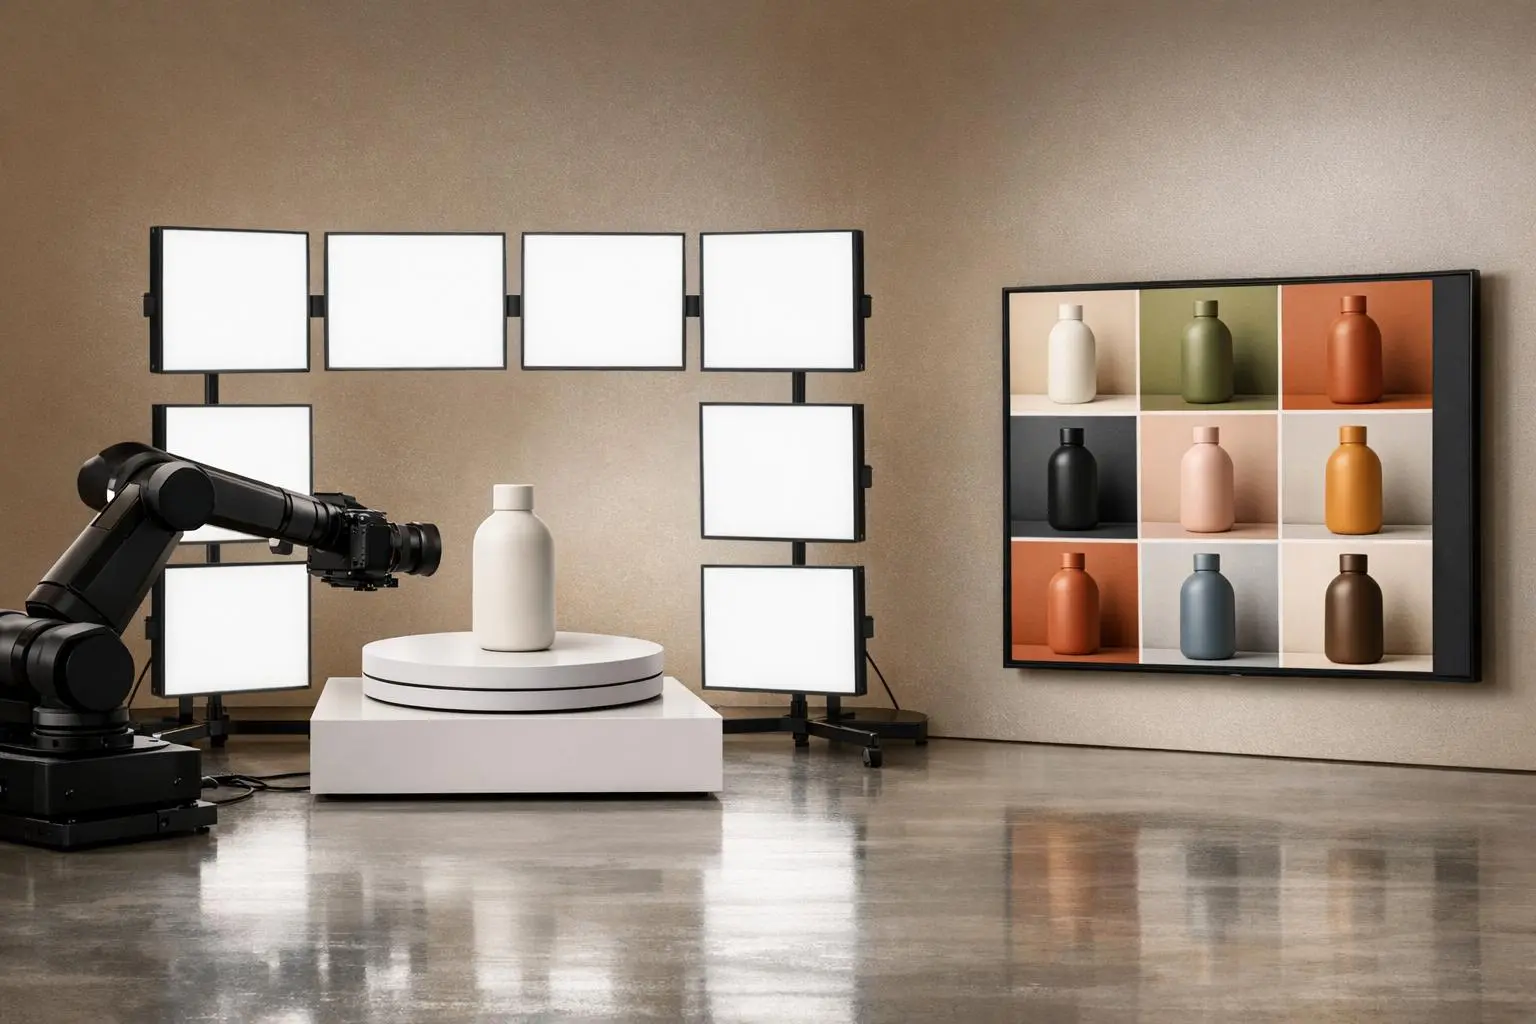
What LIGHTING Flatters Your AI Model Most? (M.U.S.E.™ Lighting Breakdown)
sbb-itb-2c1a147
How Lighting Creates Realism in AI Models
Lighting isn’t just a detail – it’s the foundation of how an image communicates. When AI-generated models look off, it’s often because the lighting doesn’t follow the rules of real-world physics. The human eye is highly sensitive to light behavior, and even small inconsistencies can trigger the "uncanny valley" effect. This phenomenon makes models feel subtly artificial, which can leave shoppers uneasy.
To create a realistic AI model, the lighting must come from a single, consistent source, producing matching shadows and natural highlights. These elements are critical for showing garment fit and texture, two factors that help build trust in online shopping.
AI models achieve photorealism by simulating ray-traced physics – a technique that mirrors how light interacts with surfaces. This includes light falloff, diffuse reflections on matte fabrics, and specular highlights on glossy materials. Realistic light intensity follows the inverse square law, meaning light weakens by 1/d² as it moves away from the source. For example, specifying a distance like "2m from the subject" helps the AI create depth and avoid flat, lifeless images. These principles lay the groundwork for the techniques explained below.
Core Principles of Realistic Lighting
Professional-level AI mockups often use a three-point lighting setup, inspired by studio photography. Here’s how it works:
- The Key Light is the main source, defining the subject’s form and casting primary shadows.
- A Rim Light, placed behind the subject, separates it from the background, avoiding that "floating" look.
- The Fill Light softens shadows and reduces contrast for a balanced, natural appearance.
Color temperature is another essential factor. Using Kelvin scales – like 3,200K for warm tungsten light or 5,600K for daylight – creates realistic warm-to-cool contrasts. Generic prompts like "cinematic lighting" often fail because they focus on mood rather than physics. Instead, specific instructions like "key light at 45° from camera, 2m distance" anchor the light source and produce consistent results.
How surfaces interact with light also matters. Specular reflections produce sharp highlights, perfect for rendering shiny objects like jewelry or polished metals. Diffuse reflections scatter light evenly, which is ideal for matte fabrics and realistic skin tones. For skin, subsurface scattering – where light penetrates and diffuses within the surface – avoids the "plastic" look that screams AI generation.
| Lighting Type | Description | Effect on Realism |
|---|---|---|
| Specular Reflection | Mirror-like reflection on glossy surfaces | Crucial for rendering jewelry, chrome, or polished items |
| Diffuse Reflection | Light that scatters evenly across a surface | Key for realistic matte fabrics and natural skin tones |
| Soft Shadows | Created by large area light sources (e.g., overcast sky) | Mimics natural outdoor or softbox studio lighting |
| Hard Shadows | Created by small, direct light sources (e.g., spotlights) | Adds dramatic contrast and depth |
AI Techniques for Natural Lighting Simulation
Building on these principles, modern AI tools refine natural lighting even further. Using 4K resolution allows AI to capture subtle light interactions with precision. Lower resolutions often fail to replicate the nuanced ways light behaves across different materials, breaking the illusion of realism.
To avoid common lighting issues, use negative prompts like "harsh rim bleed", "overblown highlights", or "lens flare" to eliminate light pollution that can wash out contrasts. For catalog shoots or video production, locking seeds ensures shadows and highlights stay consistent across frames. This level of consistency is what separates polished, professional results from amateur attempts where lighting shifts distractingly between images.
When generating models from product photos, start with evenly lit source images to prevent mismatched shadows in the AI output. Advanced AI systems can regenerate the entire image from scratch rather than merely "painting" clothes onto a model. This approach results in cohesive lighting, shadows, and fabric textures.
Using Textures for Depth and Authenticity
While lighting sets the stage, textures bring AI-generated models to life. Even with flawless lighting, a lack of detailed textures can push models into the "uncanny valley" – that strange, off-putting space where something looks almost real but not quite right. This can erode trust in a brand and make shoppers second-guess their purchase. Just like lighting, precise textures are essential for creating models that meet expectations and feel believable.
Textures do more than make a model look good – they communicate important details. They let customers see the weave of linen, the sheen of silk, or even the texture of skin pores. These small details help build confidence in the product, giving shoppers a better sense of how it will fit, drape, or feel. Combined with great lighting, textures deepen the visual story and make the product feel tangible.
The difference between something that looks real and something artificial often comes down to surface details. Smooth, plastic-like skin is an instant giveaway of AI generation, while visible pores and natural imperfections make the model feel real. Similarly, fabric that looks stiff or unnaturally flat can ruin the illusion, but realistic folds, draping, and stitching create garments that look believable.
Key Texture Types for Fashion Models
Once lighting is nailed down, textures take realism to the next level by showcasing the true qualities of materials. Here are three texture types that are especially important for fashion models:
- Skin Textures: Realistic skin needs visible pores, subtle color variations, and subsurface scattering – a way light diffuses within the skin instead of bouncing off like plastic. Without this, skin can look waxy and mannequin-like.
- Fabric Textures: To make fabric look real, details like weave structure, thread count, and material properties are key. For instance, cotton and wool benefit from a matte finish with higher roughness, while silk and satin need lower roughness to create sharp highlights. Folds, creases, and gravity-responsive draping are also essential – stiff or misaligned fabric instantly breaks the illusion.
- Accessory Materials: Items like jewelry, leather, and metal hardware each reflect light differently. Using a Normal Map can add depth and fine details (like stitching or grain) without increasing computational load. Meanwhile, Roughness Maps control how light scatters, determining whether a surface looks glossy or matte.
These texture elements lay the groundwork for advanced AI techniques, ensuring materials look and behave like their real-world counterparts.
AI Methods for Creating Realistic Textures
Modern AI tools rely on Physically Based Rendering (PBR) workflows, which mimic how light interacts with materials. This involves multiple texture maps – like Albedo (base color), Roughness, Normal, Ambient Occlusion, Height, and Metallic – to replicate real-world surface behavior. For textiles, the metallic map is usually set to zero unless metallic threads, like lamé, are part of the fabric.
AI upscalers enhance textures by reconstructing fine details at the pixel level. They sharpen fabric weaves and elevate texture quality to studio standards. As Veeton explains:
Advanced deep learning techniques, such as AI upscalers, are central to achieving realistic skin and fabric textures that build customer trust.
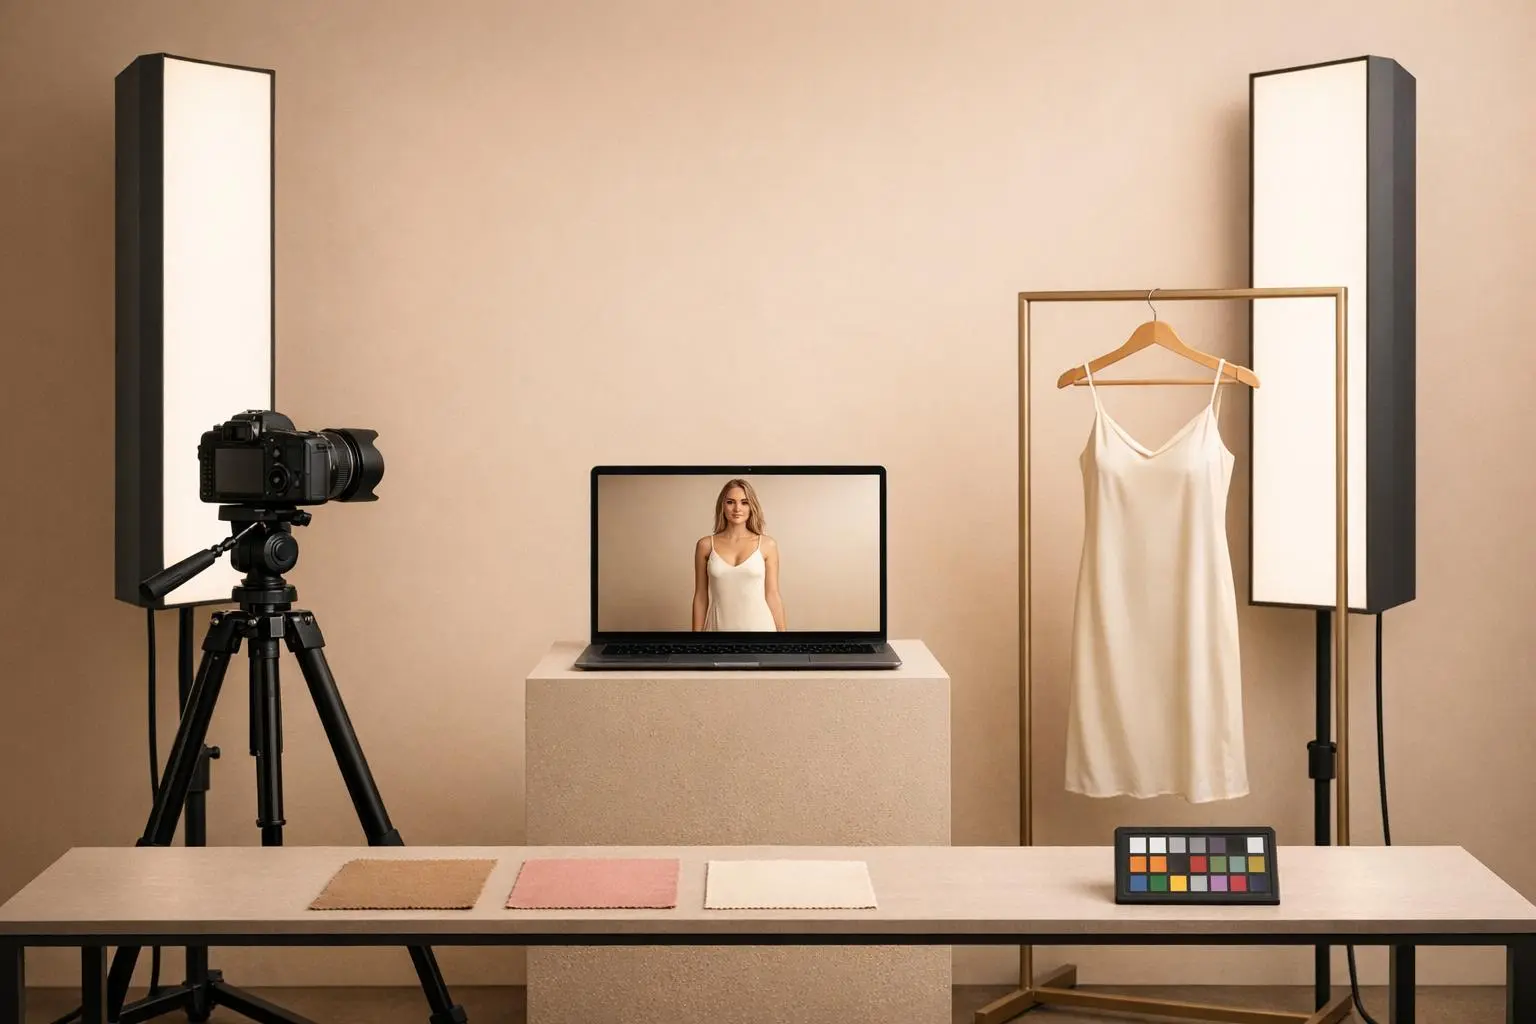
High-quality inputs are a must for achieving realistic textures. Garments should be steamed and wrinkle-free before photos are taken, as imperfections will carry over to the final output. Even, shadow-free lighting on a neutral background is also essential to avoid conflicting shadows that could disrupt texture accuracy. Starting with clean, well-prepared inputs ensures the final textures feel as real as possible.
How to Improve Lighting in Mock It AI

Mock It AI simplifies the process of creating professional lighting setups by automating controls that traditionally required manual effort and expensive studio gear. In just 30 seconds, it can generate photorealistic lighting effects. To make the most of its features – like model customization and photography style settings – you’ll need to understand how to tailor the platform to suit your brand’s look and product requirements. Here’s a step-by-step guide to help you optimize your lighting results.
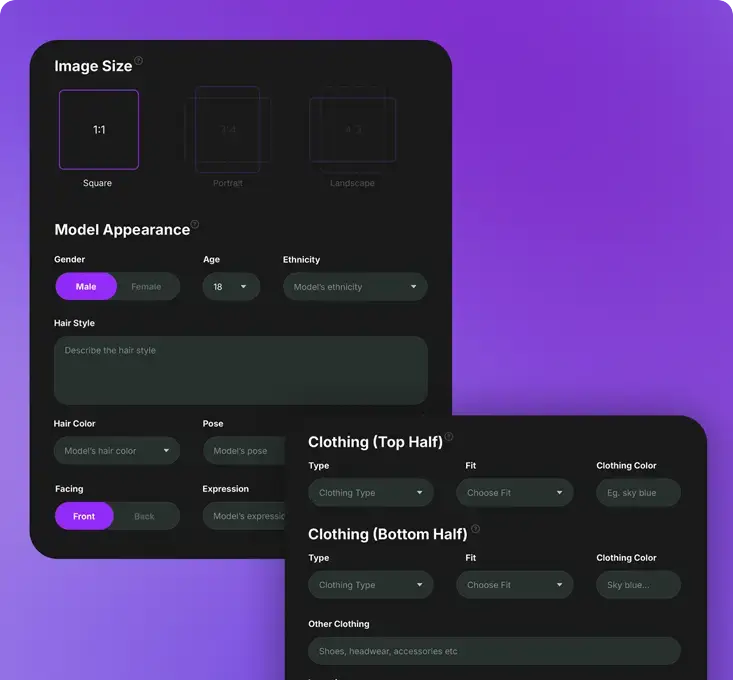
Step 1: Build and Customize Your Model
The process begins with selecting a base model that resonates with your target audience. Mock It AI allows you to customize models by tweaking attributes such as skin tone, body shape, and facial features. These adjustments are crucial because the AI uses these details to calculate how light interacts with the model’s skin and clothing. After setting up your model, choose and position the garment carefully – this ensures the scene is ready for precise light rendering. A well-prepared model sets the stage for creating realistic lighting effects in the following steps.
Step 2: Apply AI Lighting Tools
Mock It AI provides several tools to manage lighting in your mockups. Start by picking a Photography Style to establish the overall mood. Then, use the Location Creator to define the environmental light source, whether it’s a rooftop at sunset or a bright indoor studio. For more precise control, the Prompt Builder lets you specify lighting qualities like "warm ambient", "directional sunlight", or "volumetric."
Tyler K., a verified user, shared his experience:
I sell online as a side thing, and I don’t have time for shoots, props, or finding ‘good light.’ I can make images that don’t look homemade.
These tools work together to guide the AI in creating lifelike shadows, highlights, and reflections on both the model and the fabric.
Step 3: Adjust Shadows and Reflections
The final step is refining shadows and reflections to add depth and realism. Mock It AI’s 3D Mapping feature ensures that clothing naturally conforms to the model’s body, allowing the AI to calculate how light interacts with folds, textures, and seams. This prevents the flat, unrealistic look that can occur with less sophisticated mockups. You can also tweak Lens Options, such as wide-angle or close-up settings, to control the depth of field and focus light on specific parts of the garment. If needed, regenerate the images to fine-tune the results further.
How to Improve Textures in Mock It AI
Once you’ve adjusted the lighting, refining textures is the next step to make your designs look more realistic. Textures bring out the character of fabrics, showing how materials like cotton wrinkle, denim stretches, or silk reflects light. Mock It AI simplifies this process with automated texture rendering, using advanced 3D mapping and fabric distortion tools. This eliminates the need for manual editing in programs like Photoshop. Trusted by over 6,000 fashion designers and capable of creating high-quality mockups in under 30 seconds, Mock It AI offers a fast and reliable way to enhance your textures for professional-grade results.
Step 1: Upload Designs and Define Materials
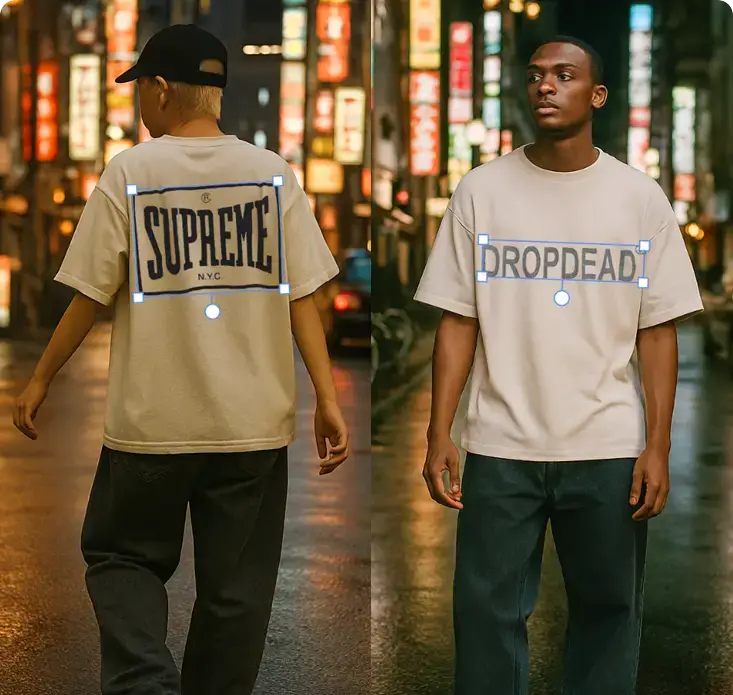
Start by uploading your design through the Add Your Design feature. Place your artwork on the garment of your choice – whether it’s a t-shirt, hoodie, or sweatpants. The AI automatically adjusts your design to fit the garment’s shape and contours.
Next, use the AI Fashion Design Generator to specify the type of fabric. Describe the material as precisely as possible, using terms like "heavy indigo denim", "chunky cable knit", or "sweat-wicking second-skin fabric." The more detailed your description, the better the AI can simulate how the fabric behaves, from its drape and stretch to its surface details like weave patterns or shine.
Step 2: Use AI Tools to Improve Textures
Mock It AI’s Realistic Texture Feature is designed to enhance fabric details. Once you’ve defined your material, use the Prompt Builder to refine texture qualities. Input descriptors like "breathable, wrinkled linen" or "heavy cotton fleece" to guide the AI in creating realistic surface interactions.
For added authenticity, the fabric distortion tools let you simulate effects like stretching or bending, showing how the design interacts with the garment. You can also adjust the view using macro or close-up lens settings to showcase intricate details like stitching, seams, or texture patterns. Sarah M., a verified subscriber, shared her experience:
Mock It AI enables rapid, professional mockups with minimal effort.
Once you’re satisfied with the enhanced textures, you’re ready to generate your mockups.
Step 3: Generate Mockups and Iterate
With your texture settings configured, generate your mockup. Mock It AI produces high-resolution PNG images, offering options for square (1024×1024 px), portrait (1024×1536 px), or landscape (1536×1024 px) formats. Review the mockup to ensure the fabric and design are well-integrated.
If you’re not fully satisfied, you can tweak the prompts or adjust the distortion settings and regenerate the mockup. Jamal R., another verified subscriber, highlighted the platform’s ease of use:
Mock It AI gave me consistent images without me having to learn Photoshop or pay someone.
This streamlined process allows you to experiment with different texture variations quickly, ensuring your mockups are as lifelike as possible.
Combining Lighting and Textures for Professional Results
AI vs Traditional Fashion Photography: Cost and Efficiency Comparison
Building on earlier discussions about lighting physics and texture fidelity, combining these two elements can elevate your visuals from basic mockups to polished, catalog-ready images. When lighting interacts correctly with fabrics – showcasing how different materials either absorb or reflect light – it creates a sense of realism that builds trust with viewers. This connection is critical in e-commerce, where high-quality, realistic images can boost conversion rates by up to 33%.
Consistency is key. Lighting should align seamlessly across all texture details. For instance, shadows on a model’s face must match the shadows within fabric folds. Similarly, fabric weaves should naturally catch and reflect light, emphasizing raised threads and deep creases. This attention to detail helps avoid the uncanny valley effect, where visuals that are almost realistic can feel unsettling to viewers.
To streamline this process, Mock It AI uses fashion-specific AI models that simulate how different materials respond to lighting. Provide a detailed fabric description and a studio lighting setup, and the system renders fabric textures and shadows with remarkable accuracy. This approach ensures light interacts with materials in a way that feels authentic.
Let’s see how this compares to traditional methods.
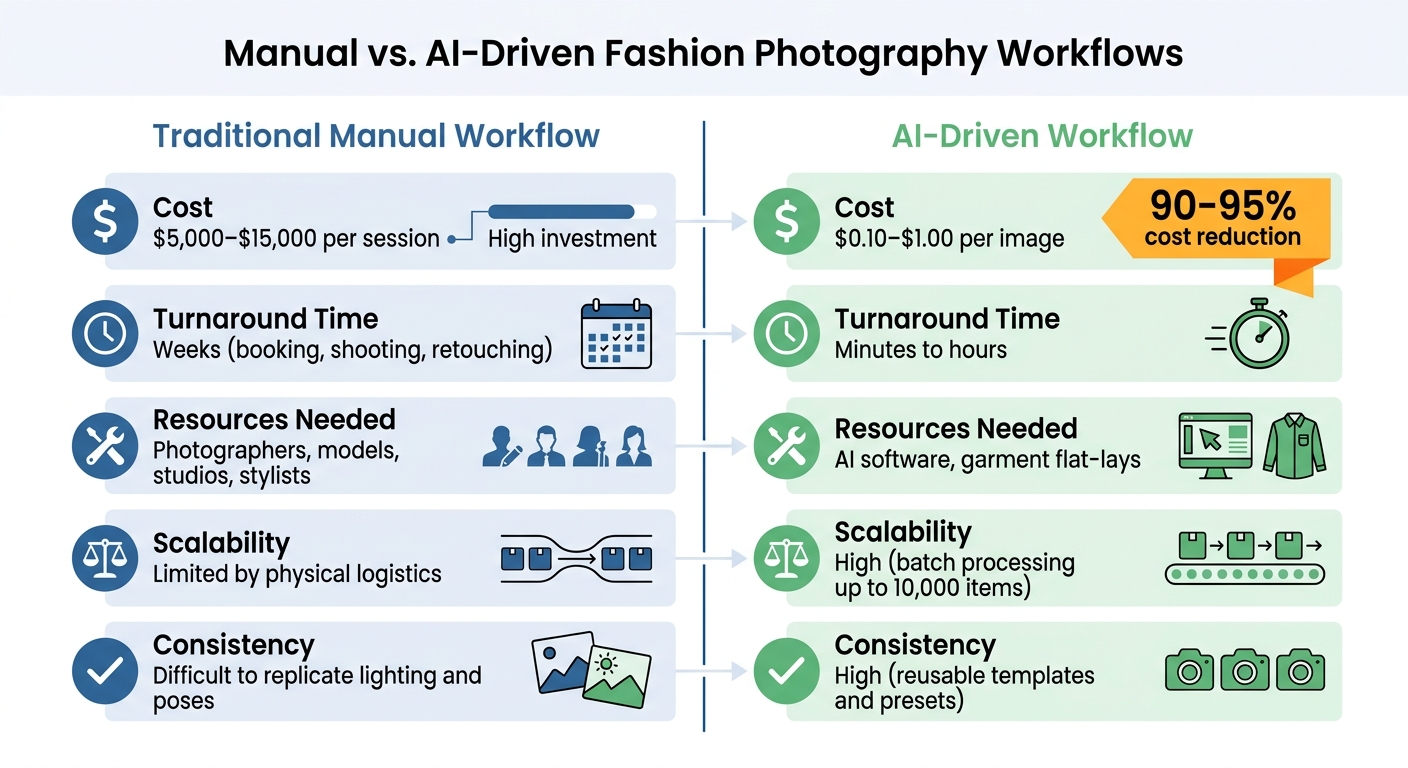
Manual vs. AI-Driven Workflows
The differences between traditional photography and AI-driven workflows are striking, as shown below:
| Feature | Traditional Manual Workflow | AI-Driven Workflow |
|---|---|---|
| Cost | $5,000–$15,000 per session | $0.10–$1.00 per image |
| Turnaround Time | Weeks (booking, shooting, retouching) | Minutes to hours |
| Resources Needed | Photographers, models, studios, stylists | AI software, garment flat-lays |
| Scalability | Limited by physical logistics | High (batch processing up to 10,000 items) |
| Consistency | Difficult to replicate lighting and poses | High (reusable templates and presets) |
While traditional photoshoots excel in garment accuracy, they come with steep costs and long timelines. AI workflows, on the other hand, can cut costs by 90–95% and handle thousands of SKUs daily.
That said, even AI-driven processes aren’t foolproof. Avoiding common mistakes is essential to achieving professional results.
Common Mistakes to Avoid
Even with automation, a few errors can compromise your final output:
- Wrinkled input photos: Wrinkles in source images carry over into the final mockup, creating an unpolished look. Always steam garments before photographing.
- Inconsistent lighting direction: Lighting direction must remain uniform. Mismatched shadows across products can disrupt realism and make images feel artificial. Keep lighting settings consistent for the entire collection.
- Inaccurate details: General-purpose AI tools may introduce errors like extra buttons, misplaced pockets, or distorted logos. Fashion-specific platforms like Mock It AI ensure details align with real-world physics.
- Plastic skin effect: Over-smooth skin without pores or imperfections can feel unnatural, triggering the uncanny valley effect. AI should render subtle skin textures to maintain authenticity.
As Veeton points out:
Consumers perceive these ‘off’ visuals as unprofessional or deceptive, which can harm brand integrity and increase bounce rates
.
Conclusion
This guide has demonstrated how mastering lighting and textures can create AI-generated fashion models that closely resemble traditional photography. When done right, these elements produce visuals that align with modern e-commerce standards. And that’s critical – 90% of shoppers consider photo quality a top factor in their buying decisions, and realistic on-model imagery can boost conversion rates by as much as 33%.
On the flip side, poorly executed details can trigger the uncanny valley effect, making visuals appear unprofessional or even misleading. As Teresa Trimm aptly explains, "light lays the foundation for visual communication, and texture transforms illusion into a tactile experience”.
Mock It AI tackles these challenges head-on with tools specifically designed for achieving fashion realism. Already trusted by over 6,000 fashion designers, the platform generates high-quality mockups in under 30 seconds. Features like 3D mapping ensure designs conform naturally to fabric folds, while customizable lighting tools give you full control over shadows and reflections. This approach not only enhances visual quality but also delivers major cost savings.
To put it into perspective, traditional photoshoots can cost anywhere from $5,000 to $15,000 per session. In contrast, AI-generated images cost just $0.10 to $1.00 each. Mock It AI’s pricing starts at $12 per month for 100 credits, making professional-grade mockups affordable for brands of all sizes. Whether you’re debuting a new collection or scaling operations, the platform’s speed, affordability, and attention to detail make it an indispensable tool for today’s e-commerce landscape.
FAQs
How do I choose realistic lighting for my clothing mockups?
When designing clothing mockups, lighting plays a huge role in making them look professional and lifelike. To get realistic lighting, you need to be specific about the lighting conditions when crafting your AI prompts.
For example, specify whether you want natural daylight, a studio setup, or even a particular light angle. These details help emphasize fabric textures and garment details, giving your mockups a polished look.
Also, include information about the direction and intensity of the light. This ensures the AI generates images with accurate illumination, making your designs stand out with a natural and professional finish.
What texture details make an AI fashion model look real?
Realistic texture details in AI fashion models focus on capturing the nuances that make visuals feel lifelike. For skin, this means incorporating features like pores, fine lines, and small imperfections to avoid that overly smooth, plastic-like appearance. When it comes to clothing, the texture of fabrics plays a huge role – showing folds, weave patterns, and even the subtle sheen of different materials helps convey authenticity.
Lighting also makes a big difference. Accurate reflections, shadows, and highlights add depth and dimension, making the materials and skin look more tangible. These elements work together to create visuals that are not only photorealistic but also engaging, which is especially crucial for drawing in e-commerce shoppers.
Why do my AI images look “uncanny,” and how can I fix it?
AI-generated images can sometimes feel unsettling because of problems with lighting and textures, two elements that are crucial for creating realistic visuals. For instance, inconsistent lighting – such as shadows that don’t match the light source or light coming from impossible angles – can make an image look unnatural. To address this, ensure the light’s direction, intensity, and color are consistent and believable.
Textures are another common issue. When surfaces appear too flat or unnaturally smooth, the image loses its sense of realism. To improve this, use prompts or reference images that emphasize material details, like how fabric folds or how light interacts with reflective surfaces. These small adjustments can make a big difference in creating images that feel more lifelike.